Professional Painting Contractors Forum banner

Oak door and jamb stain and finish

17K views 57 replies 10 participants last post by  Holland  
#1 · (Edited)
It has been a long time since I have stained and finished wood. I need to give a quote to stain a new oak door, jamb and trim. This is in a 1000 sq ft office that is part of a 30,000 sq ft office bldg. The owner, after showing me the door (pun not intended), referred me to the future occupant for staining and finishing this door.

She (the future occupant) emailed me regarding this. She said that she had picked up a quart of Minwax Wood Finish Penetrating Stain in golden oak as well as a quart of Minwax Polycrylic in clear satin. She did mention that she was open to other suggestions as far as stain and finish go.

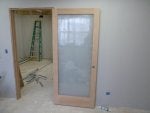
I am wondering if I should just go along with what she has purchased to keep things simple. Here is the door:


Obviously the trim has not been installed yet. Should that be stained (and finished?) before or after it has been installed?

Any thoughts? I want to do a decent job so as to possibly get future work.

futtyos
 
#2 · (Edited)
Throw some mineral spirits on there and see if she likes that 'natural' look without stain.


Otherwise:

Seal with Benite (will have a similar look to wet mineral spirits). 24 hours dry.

Stain with Lenmar, Old Masters, General finishes... Don't really care for minwax but if they already have it no reason to throw it away other than I think its rather low quality.


Ditch the polycrylic, using a quality finish. Staysclear, Old masters, General finishes etc... basically anything else.
 
#3 · (Edited)
Minwax oil stain is good for oak. Almost fool-proof, will look good wiping on.

Minwax Oil based poly would be a better choice than polycrylic. I think oil based poly looks better as it ages (ambers out, enhances wood grain), and is also easy to apply.

Tape glass first.
Maybe Clean wood with lacquer thinner to remove contaminants/ light sanding prior to stain.
Wipe on stain, remove excess after 5-10 min. (Let dry 24 hours)


Brush on first coat varnish
Lightly sand between coats with 320.
apply remaining coats (thinned with oms) using 000 steel wool, and wipe excess directionally with rag.


Pre-finish trim before installing. Fill nail holes with colored putty.
 
#6 · (Edited)
Id skip the bennite. Oak doesnt have blotchiness problems, its an extra step, and will make it stain lighter. Polycrylic is crap, but it will get the job done. three coats, light sande in between.

I'd stain, first coat, and sand the base down. After its up, color putty the nail holes, touch up the cuts if necessary, wipe really good, two more coats. You could do two coats down, I guess...

I usually dont do casing down, cuz you have to do the jamb anyway, but it doesnt really matter....
 
#7 · (Edited)
Although there are better options, If someone provided me with a stain and clear finish, I’d just go with the material provided as long as they were compatible, which they are. That way the onus is on the client if for some reason they don’t like it. It also eliminates having to buy material and sample it out which more often than not, requires a couple of attempts in getting the client to approve the color. For one door it could turn into a bit of a nuisance.
 
#9 · (Edited)
I agree with Woodco on skipping a conditioner..oak is pretty tight grained and can be difficult to get the desired depth of stain without sealing, let alone sealing it first.

I always like staining jambs and trim before trim is installed. Why not avoid having to cut in stain to wall. Plus it's good to have edge of jamb stained just in case trim shrinks a little or shifts.
 
#10 ·
I agree with Woodco on skipping a conditioner..oak is pretty tight grained and can be difficult to get the desired depth of stain without sealing, let alone sealing it first.

maybe with minwax. old masters and lenmar stains oak certainly comes off golden. That lenmar stuff is like 30% dye to pigment also.
 
#13 ·
All good suggestions here and will provide good results.

If the door will get some wear and tear I would not go poly because it is practically impossible to repair. I would get a quart of Waterlox Original Sealer and use the golden oak minwax provided.

Sand door to 220, wipe down with mineral spirits, mix 1/4 stain with 3/4 waterlox for first coat and wipe on,.
Don't worry it will be even with one or two swipes with the grain. In 24 hr wipe on 2nd coat straight waterlox , 24hr sand 320, wipe on 3rd coat of waterlox. 0000 bronze wool if you want a satin finish.

Expel air from waterlox or it will ruin within 24 hr. I just crush the can a little to get air out.

For a qicker job I use General finishes waterbased stains and High-performance waterbased poly.
 
#18 ·
@Holland I have had some pretty bad damage since I do rentals. Once a big sticker, five inches, was placed on an interior six panel pine door I had finished ten years prior. Took off 2-3 layers of poly. Since the finish had ambered I was not able to touch it up and was unwilling to sand/strip and start over. So I did as best I could and let it go because its a rental. Another house I did cabinets in Waterlox, polymerized tung oil with phenolic resin that does not get more amber with time, and have been able to make some repairs though not as nasty as the one above. I have a couple test oak cabinet doors done about 12 yr ago one with ArmRSeal poly and the other with Waterlox. I will dig them out to see if they illustrate the ambering. I like the look of the satin GF Arm-r-seal poly and use almost the same method you described. Its easier to use than Waterlox so for peices unlikely to get damage I will use poly. Stair rails is another place I use waterlox.

Maybe @Alchemy Redux can shed some light on this? I may be approaching it wrong. I probably need to update my practices as I have been doing this way for a long time.
 
#20 · (Edited)
I agree. I’ve been using pto for a good 30+ years..both by Waterlox and Sutherland Welles. It doesn’t yellow and it’s very easy to rejuvenate and repair unlike poly. I’ve used Carlisle tung oil which is Waterlox rebranded on all the Carlisle Wideplank Floors I’ve done. I always prefer the oils over poly. Can’t get that silky smooth feel with a poly film finish like you can with oils. Also used a lot of the European hardwax-oils. They’re really nice too and don’t experience bleedback like you often get with pto in wiping applications. I’d like to try the Odie’s that Coco always speaks so highly of.

Edit: Can’t spot repair poly, pto you can. When doing a re-coat with poly you’re also building up more of a film and closing the pores. The pores start to get a little funky looking on re-coats. It doesn’t happen with oils.
 
#23 · (Edited)
I agree that there is a time and a place for a non yellowing varnish, such as whitewashed wood and modern styles, Maple, etc... but is maybe a non-factor if the wood is being stained w/Golden Oak. Future touch ups would need to be stained to match.

Ambering of clears is often desirable on oak. It enhances the grain, and adds depth and luminosity as it ages.
 
#28 ·
@Alchemy Redux Thanks! I see that door was quartersawn white oak. Nice look. Knowing WHY you do something a particular way helps. I also do most of my floors with pto basically for same reasons. I have about 1400 sq ft of QS White Oak to lay and finish. Trying to decide on stain color. I still use lambs wool applicator for stain and pto. First coat I use 25 % stain in 75% pto. I know some use rollers how about you?
 
#30 · (Edited)
The only times I’ve used a roller on a floor were with Bona Kemi Traffic & Mega, Basic Coatings Street Shoe, and oil based Lenmar & PoloPlaz Primero polyurethanes.

My preferences for stains when using tung oil are premixed tung oil dye stains or oil soluble aniline dyes incorporated into the tung oil. Pigmented stains often interfere with the performance of the oil finish unless mixing them with the oil like you mentioned. Just have to be careful with colorfastness when using dyes. Methods for stain application vary, sometimes padding it on, other times brushing it on.

Applying the tung oil varies as well. Sometimes I’ll pad on a coat or two of thin PTO sealer, and apply subsequent coatings using a rotary floor buffer for the application, excess removal, and buffing. I’ll often apply 6 coats in total when buffer applied. It all depends on the look I’m trying to achieve and the type of oil. My preference is not to apply oils like a film finish by padding it on, preferring buffer applied. Just have to be careful with oil bleed-back when utilizing a rotary floor buffer with tung oil.

The hardwax-oils are a lot less work and are something worth considering as an option to tung oil.

Below is a instructional video on buffer applied oil, the technique being very similar to the the method I’ve always used. For the instructional video, they’re using RMC. The portion of the video that applies is from 0:45 to 3:00

 
#31 · (Edited)
@Tprice2193
I figured I’d add that the first time I used Watorlox Original was in 2003. The product used was Carlisle’s rebranded Waterlox for one of Carlisle’s portfolio case study projects, the project also being published in Elle Decor’s July/August 2006 edition in an article entitled “Learning Curve”.

I opted not to apply it in accordance with the manufacturer’s specifications, utilizing the buffer applied method and wiped each coat dry. Carlisle found issue with the modified procedure, getting in between me and my interior design client who owned the home, insisting premature finish failure was inevitable.

Prior to that I was only one of a few finishers on the East Coast who was buffer applying and using burnished oil finishes dating back to the mid 80’s, buffer applied burnished oils now being the floor finishing standard. They made the video for the case study ~ 10 years after performing the work, putting it up on their website, the floors looking like they were finished yesterday. They were amazed at how well a non-film application performed when not done in accordance with the spec, especially after negatively criticizing my methods, predicting failure within the first year being placed into service.

Since then I’ve finished several other Carlisle installations in the same fashion utilizing Waterlox. I’ve also applied it as more of a film finish in accordance with the manufacturer’s spec, the finishes developing scuff marks and not holding up nearly as well as the more traditional wipe on wipe off method when buffer applied.
 
#32 ·
@Alchemy Redux - Thanks for the tips! Its rewarding to have you procedures adopted! I guess I could see Carlisle's concern for shearing because of the small amount of resin in Waterlox Original being buffed in. Guess it is a small enough percentage that it goes in the wood with the oil or is mechanically transformed. I will try this on my next floor. I might practice the process on a walnut gun stock and table I need refinish

2003 is about same time I started using Waterlox on cabinets. Did some floors applied with the lambs wool but was not 100% satisfied with them. 2-3 coats Waterlox original with 4th coat high luster which has more resin. To bright for me. Some of the cabinet jobs on oak I wet sanded in the waterlox original with 400 grit which worked as pore filler and top coated. I am assuming with sufficient buffing you would get pore fill? Maybe wet sand in then buff with maroon pad? Thank for tips!
 
#33 · (Edited)
With oils I prefer minimal pore fill. The high gloss is awful. I did a project for Dick Grasso who was the former chairman of the NYSE. He wanted an ebonized high gloss Waterlox finish. I ebonized them using iron acetate followed by a concentrated aniline TO dye stain, finishing them utilizing the sealer topped off with high gloss. I included a photo of one of his floors, almost being embarrassed putting my name on it or to even post it here. The dished grain isn’t from me either, the client having provided his own flooring sander.

The Waterlox when buffer applied experiences a lot of bleed-back due to the high solvent content. I often have to stick around for hours after the applications, stepping onto the not so completely dried floors and wipe off the bleed-back and oil speckling before it dries. With buffer applied burnished oils, the European hardwax-oils are IMO better and don’t bleed-back and speckle due to the higher oil content, some having upwards a 90+% oil content. The European hardwax-oils are engineered for automated line finishing where there’s no tolerance for bleed-back. Sometimes as finishers we pigeonhole ourselves, not exploring and trying better products.

A lot of finishers prefer the RMC oil plus 2c for burnished and line finished oil applications. I think the RMC oil plus 2C is an isocyanate catalalyzed linseed oil which yellows a bit. It doesn’t hold up in wet locations and kitchens. Although it contains engineered waxes, most finishers apply a 2K WP PU over it in wet locations, the WB poly having decent compatibility with the engineered waxes.

One of the earliest innovators and developers of PTO floor finishes was a friend and mentor of mine. He’d actually purchased his first oil cooker from Waterlox, cooking/polymerizing his own tung oil finishes. His finishing business at one time was based in the Carolinas, where he introduced his buffer applied techniques and tung oils to other finishers in the Atlantic region. He ultimately set up a tung oil finish manufacturing and retail business, his company being Sutherland Welles Ltd now based out of VT.
 
#42 · (Edited)
Oak is easy, no sealer necessary.
(Sealers are sometimes needed on Pine and Maple because that can absorb unevenly, and can sometimes result in a "blotchy" stain).

Oak tends to look good/great with just a standard oil rubbing stain (like Minwax).

If you need a refresher, pick up a sample of oak trim and rub the stain on, and then wipe of excess. Let it dry overnight before Varnishing (Poly).

Staining Oak is easy.
Varnishing is always the step that separates the chaff from the grain.

Clear Coat:
x(2) coats to look good, x(3) to feel good.

(sand between coats #320, avoid the edges)
* -note- Sanding varnish too aggressively before fully cured can result in burnished spots that will show through the final coat. It is best to concentrate on a light sanding, only to remove lint, light bumps, etc...

I like to brush the first (and sometimes second coat) to create "build", and then subsequent coats use the same poly thinned with OMS/Poly (ie., creating a "wiping" poly) applied with a 000Steel wool and wiped with a lint free smooth cotton rag

This leaves a clear that looks nice and feels great with minimal effort.
 
#43 · (Edited)
Oak is easy, no sealer necessary.
(Sealers are sometimes needed on Pine and Maple because that can absorb unevenly, and can sometimes result in a "blotchy" stain).
Ive only found that to be the case with low quality stains like minwax and other 'penetrating' pigment based stains. Lenmar, General finishes waterborne, dyes, and gel stains, all come out looking very nice on traditionally blotch prone woods. The GF 'retail' stain comes out looking especially even though it masks the grain a little more than I would like. Same with the SamaN stains.


Sanding sealer is a different use than a conditioner/sealer as well.
 
#57 ·
@cocomonkeynuts

Curiosity getting the better of me, after doing a web search, NA appears to be readily available through a number of chemical manufacturers. It was nearly impossible to acquire in 2001 immediately following 9/11 when I was using it. Being a precursor chemical used to make explosives, there may have been restrictions and/or a moratorium limiting the sale and/or distribution as well as the monitoring of down stream uses, particularly with painters in their Hillbilly labs. I had to go though a bit of red tape when purchasing it.

On the topic of non self sealing finishes, although it’s always best to follow tech sheets, there are a number of non self sealing products where I’d regularly skip the specified sealer and use the products directly on raw wood surfaces. I’d only consider it after testing adhesion and chemical resistance which doesn’t always insure performance. The sealers that I nixed served the functions of reducing tannin pull & finish material consumption, allowing for quicker film build, some of the sealers having a lower pH than the finish, serving as a barrier against high pH clears which tend to darken tannin rich wood species.

I quickly learned the importance of using vinyl sealer under CAB my first year out, some of the CAB finishes experiencing failure in wet locations when not using vinyl sealer.

Since first using water anything products, I’ve always water popped and de-nibbed before applying water dyes and/or water clears, grain raise sometimes presenting problems.