I really want to get into doing this i was going to do a few samples. I am planning on am accent wall in my living room, just looking for some tips from those experienced in this craft. I have many years of painting experience and some faux work but never tried this finish. Any tip would b greatly appreciated thanks from TN.

Venetian plaster tips.
TNpainter
21 - 30 of 30 Posts
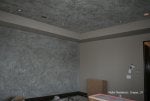
Some VP we did about 2 years ago.
We had 1 person roll on the first coat of VP nice and thick. Then another person would come behind them with a trowel to give it texture. Then one more coat of VP applied with a trowel very thin and then its polished.
We had 1 person roll on the first coat of VP nice and thick. Then another person would come behind them with a trowel to give it texture. Then one more coat of VP applied with a trowel very thin and then its polished.
Attachments
-
90.7 KB Views: 314
-
97.5 KB Views: 246
-
85.1 KB Views: 1,487
-
81.3 KB Views: 248
Joined
·
106 Posts
VP is work and once you get over the newness of doing the work you will never give it away for low cost. Fortunately there are so many ways to do VP .Legitimate company products are best and strongest . But I have done many a nice job using paint tint mixed with compound . When complete I then take a acrylic clear and burnish it in . Over all it looks nice but walls are not as rock hard. But when doing VP paint wall a close color to save on some material . I like all VP products some have a bit more shine some less and that works out fine as there are different taste in customers
Creating a polished wall base of tinted joint compound works well before the real product also.
Creating a polished wall base of tinted joint compound works well before the real product also.
Joined
·
106 Posts
VP is not worth doing unless $25 per sq ft - that said passe or not when a customer is willing to pay for the real time needed to make glass smooth with a true marble dust VP product there is no substitute for the true effect of blading a wall smooth hour after hour . All Faux finishes have the original time consuming method used to invent or create the look , Then comes the recreation of a faster method of similar look But if some one is willing to pay for the time needed for any Faux that always is the best.VP, has become passe. The trend is pretty much over. Besides , it really isn't a very user friendly technique as it damages easily and is very difficult to touch up especially if it is waxed and a good VP is (or should be) expensive.
I steer clients away from VP. My protfolio is filled with textured techniques that are easier to do and repairable. I show several on my web site gallery and HOW TO page. http://www.EuropeanPaintandTextures.com
Joined
·
2,113 Posts
I guess it depends on how you apply it. Some trowel it and some do the roll/trowel.
I think the best way to go is the VP acrylic paint product. It's not the "real" deal, but costs a lot less and the home owner usually wants that particular thing, because chances are they've never seen the "real" product. Probably saw some stuff on TV or in another person's house that was the acrylic product and wanted it.
Venetian from Lowe's - Valspar. Is easy and dumb to work with. I did 2 fireplaces in a day. Roll/trowel. It is a lot of work, but it's not killing anyone if you've worked with it before. 1 day depending on the size of things and you should be able to finish most projects and collect a decent paycheck.
P.S. Sherwin doesn't sell a top-coat for it as far as I know which is kinda weird, seeing as its water soluble, it will actually remelt if you put water and rub it with a rag vigorously. I know Valspar tells you to buy their top coat product (trowel on), don't. Waste of time and money.
I top coat my 'fake' venetian with polycrylic, sprayed on with HVLP. Don't be bashful to load it up, the more the better you get that smooth feel. Follow the direction and your done plus you have some pretty good protection on it.
have fun.
Hi everyone,
I recently came across a fantastic guide on how to achieve professional results with Venetian plaster at San Deco USA, and I wanted to share some key tips and insights for those of you looking to take on this rewarding DIY project.
Before You Begin:
Venetian plaster offers a premium solution for enhancing living and working spaces with its timeless beauty and luxurious texture. Whether you're a seasoned DIYer or just starting, following these tips will help you achieve stunning results.
For more detailed instructions and to shop for high-quality Venetian plaster, visit San Deco USA
Happy plastering!
I recently came across a fantastic guide on how to achieve professional results with Venetian plaster at San Deco USA, and I wanted to share some key tips and insights for those of you looking to take on this rewarding DIY project.
Before You Begin:
- Gather Your Tools and Materials:
- You'll need a steel trowel and Venetian plaster, which can be found at home centers or paint stores.
- Basic painting tools such as a paintbrush, paint roller, roller covers, paint tray, and tray liners.
- A coat of primer or flat wall paint is necessary before applying plaster to bare drywall.
- An optional clear topcoat can be applied with a trowel after the plaster has dried to protect it in high-traffic or high-moisture areas.
- Safety Considerations:
- Always wear eye protection if you’re spreading plaster overhead.
- Use breathing protection while polishing plaster to avoid inhaling plaster dust.
- Wear gloves while applying and mixing plaster to prevent skin irritation.
- Prepare the Walls:
- Clear any furniture and protect the floor with a drop cloth.
- Fill and sand any cracks or holes for a smooth surface.
- Clean the walls to remove dirt or grease for better adhesion.
- Prime unfinished drywall with flat paint.
- First Coat:
- Use a flexible steel trowel or a 4- to 6-inch drywall knife.
- Hold the trowel at a 15- to 30-degree angle and apply a thin coat with varied strokes for texture.
- Second Coat:
- Apply another thin coat at a 60- to 90-degree angle.
- Use an overlapping X-shaped pattern for thorough coverage.
- Let the plaster dry for 24 hours before polishing.
- Burnishing:
- Buff the surface with 400- or 600-grit sandpaper in circular motions.
- Wipe the surface with a damp cloth.
- Rub with a clean trowel or putty knife for a polished look.
- Final Coat:
- Apply a Venetian finish or paste wax with a trowel for added luster and protection.
- Buff the topcoat as you did with the plaster.
- Mix the plaster thoroughly before each use.
- Practice on spare walls or unused rooms to hone your skills and experiment with textures.
- When tinting plaster, mix small batches and track your colorant ratios to maintain consistency.
- For glossy paint surfaces, lightly sand to ensure better plaster adhesion.
- Round the corners of your trowel or knife with 100-grit sandpaper to prevent scratch marks.
Venetian plaster offers a premium solution for enhancing living and working spaces with its timeless beauty and luxurious texture. Whether you're a seasoned DIYer or just starting, following these tips will help you achieve stunning results.
For more detailed instructions and to shop for high-quality Venetian plaster, visit San Deco USA
Happy plastering!

DIY Venetian Plaster Guide: Pro Tips for Perfect Walls
Master Venetian plastering at home with our step-by-step guide! Learn techniques, safety tips, and tricks for flawless walls. Get professional results today!
 sandeco-us.com
I love San Deco USA Venetian Plaster! (Decostucco) Amazing quality and they were very helpful when I reached out to them for my application! Definitely recommend!!!
Just use the San Deco Venetian Plaster, trust me It`s the easiest and the best one to work with !!Finny because I just did some Venetian plaster Fri. At a department store and I"d never did it before and it was, I'd say, very easy if not almost idiot proof. I used a sherwin Williams product, trowel on. I did two coats over previously painted white drywall to match exhisting work nearby and when done they were indistinguishable between what I did and the work that was there. The point of all that is just that it is easy for a painter with basic skills to do is all.
Joined
·
3 Posts
What’s a fair price to charge for VP per SF?
21 - 30 of 30 Posts
-
?
-
?
-
?
-
?
-
?
-
?
-
?
-
?
-
?
-
?
-
?
-
?
-
?
-
?
-
?
-
?
-
?
-
?
-
?
-
?
- posts
- 748K
- members
- 43K
- Since
- 2007
A forum community dedicated to professional painters. Come join the discussion about the industry, safety, finishing, tools, machinery, projects, styles, scales, reviews, accessories, classifieds, and more!
Top Contributors this Month
View All
finishesbykevyn
20 Replies
foz1359
16 Replies
MikeCalifornia
13 Replies


